Showing posts with label DIY. Show all posts

Sunday, July 31, 2016

Mini setup during the summer break


While I was back in France, far from my hydroponic setups, I couldn't resist to build another setup for next year. I'll have to rely on my inlaws to start the seedlings, but the idea is to get tomatoes & herbs for next summer.
I'll have to build the sensors for my next trip in February so I'll be able to remote monitor the installation.

The Grow Pipe


 First we'll start with a standard 100mm gutter water chute pipe. They are quite easy to find in 4m length or pre-cut. Get the Elbow that fits the 100mm. In France, they are not 90° but 87° so when you make a U with 2, the long pipes are not parallel.
I took one Male-Female, and one Female-Female elbow.

  • 2 x 100mm rain water pipe, 1m long,
  • 2 End caps (punch down connections,
  • 1 Male Female 87° Elbow
  • 1 Female Female 87° Elbow
  • PVC Glue
Take 2 mn to check the type of PVC glue you are buying. While in Hong Kong, they are all Hot Weather grade, in France, 80% of them are cool temperature grade... So when it's hot, they dry super fast.


The end caps I found are ready to connect 32 & 40mm pipe by just punching the pre-cut hole. It is quite convenient so you don't have to drill or loose length with adapters & reductions.

 Just glue the end caps on the 1 meter pipes. I have one intake positioned on top of the pipe, while, the water exit is on the lower part of the pipe.

 To keep the grow pipe in place on the water tank, I found these glue-on reductions (32mm). I will not glue them, but just clip the 100m in the brace.
You can see the Female-Female Elbow, and the Male-Female one.

Connections


The trick here is to use off the shelf items from any constructions/DIY shop. You are looking for opaque flexible pipe, so I found one to connect tap to the washing machine. They are threaded and come with the seals, so it's quite convenient. I also grabbed a flex to water pipe adapter and a 32mm pipe to 1/2" PVC connector.
The male connector of the washing machine hose will go on the Water Tank side and connect the flex pipe.
The female side will connect to the 32mm pipe adapter. On this side, I had to use a short 32mm PVC pipe glued inside the 100m end cap.


  • Washing Machine connection kit
  • 32mm to threaded adapter (that fits your washing machine kit end)
  • hose adapter (that also fit your washing machine kit end)


The water tank
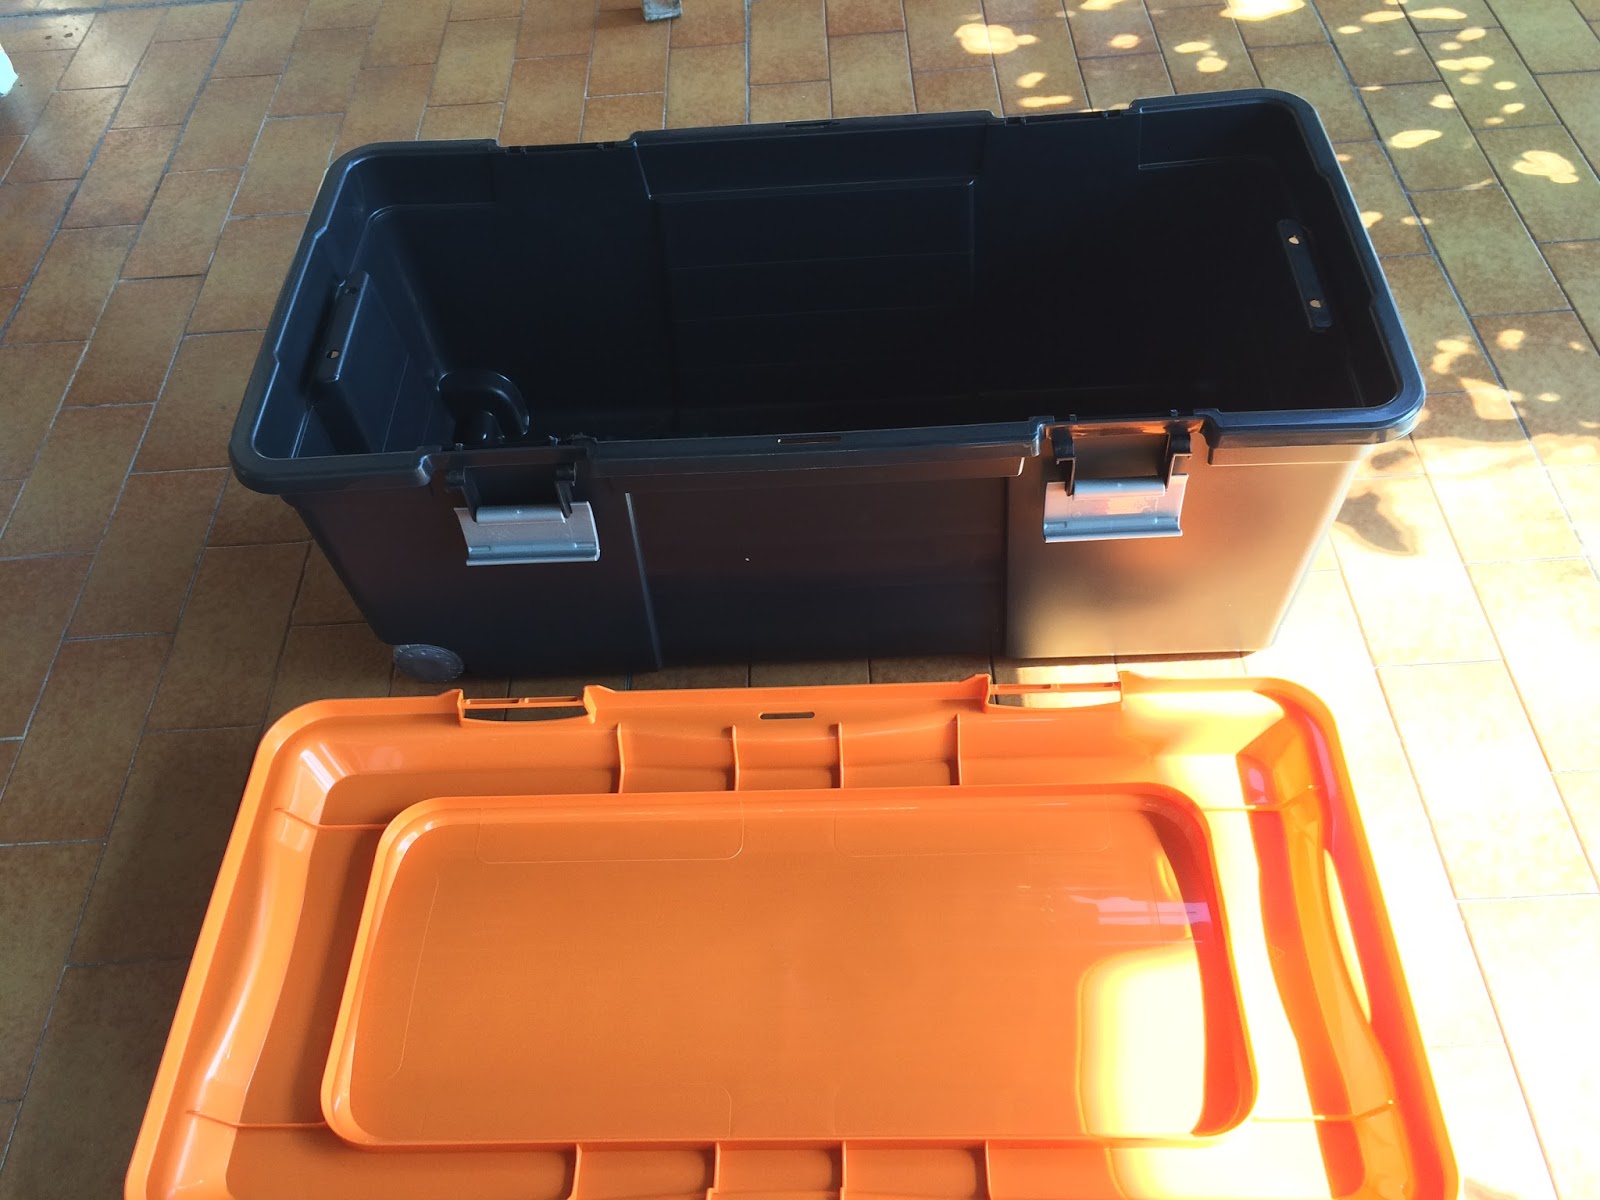

At the same DIY/Construction shop I found a super deal for 3 totes. They are 75l and what you need is a complete opaque one. Don't get any clear clothe storing ones...
Mine comes with wheels, but once loaded with the water, they'll probably crash...


  • 1 Big opaque tote (50-75l) big enough to support your grow pipes


The only thing that I had to order online is a little  pump. This is the minimal power I found on Amazon, and it's tiny.
You can be picky and go for the lower power consumption. The needed lift is not big (40cm) so you'll have many choices.

  • 50cm of clear aquarium hose (10-12mm)
  • 1 mini aquarium pump (40cm lift)


To connect the pump, drill the tote on the top of the tote. The hole has to be the same size as the male end of the washing machine connection kit. Grab a seal that fits, and screw the hose adapter.
You can then connect the clear tube (10-12mm) on the hose adapter, and plug the pump on the other end.
Place the power cord where the cover will still lock. 

As we want our tank to support the grow tube, place it on top of the cover and mark down where the braces would sit.
Then drill a 32-36mm hole for each of the 4 braces.

If you drill 36mm, the pipe will go inside and then you can glue it, if you drill 32, then use a piece of 32mm pipe as leg to sit on the bottom of the tote.


Here, I took the option of drilling 32mm, and use 32mm legs.


Last part: water return

As you remember, we have 3 holes in the end caps, two at the lower part, one at the top.
For the water return, we'll use one of the bottom one. If it's a NFT (Nutrient Film Technique) system, you don't want a lot of water in the pipe... If you want to convert it to a DWC (Deep Water Culture), then use the top hole for the exit as well.
We'll use:

  • 50cm of 32mm PVC tube
  • 1 Female Female 87° elbow
  • 1 Male Female 87° elbow
For this one you'll have to adjust the small part of 32mm pipe in between your elbows to match the distance between the grow pipe and the return hole in the tote.
First drill the 32mm hole in the tote, then glue one elbow, and position the exit elbow.


The system is almost finished once you get the exhaust pipe in place.

You can also use that setup with the grow pipe fixed on a wall, then your In & Out would need to be repositioned.


One more step before the Final one

Connect everything and fill some water in the tank (about 10cm) and give a try. Check your connections and seals and it should not leak... It is better to reglue pipes and check for leaks now than after drilling the grow site holes.

Finally: the grow site holes

Finally, you can drill he hole for your net pots. Now it is really up to you and what you want to grow. 
Vines or bushes like tomatoes, cucumbers, zucchinis would need more space between roots. Herbs and Lettuce can accommodate a higher density.
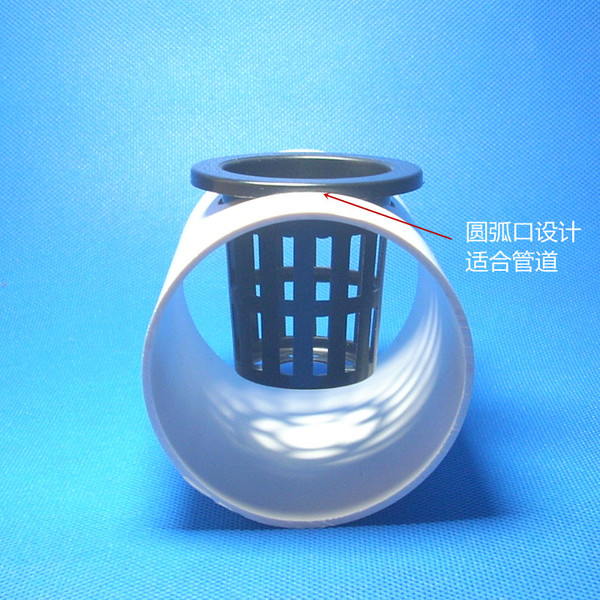

So just order the net pots first or grab some at the local gardening shop and draw a line a the top of your tube and calculate your spacing.
I like my net pots black (no light no algae) and now some of them have a carved surrounding to accommodate a circular grow tube.


Sunday, October 4, 2015

Typhoon cheap protection

This time, I didn't want my seedling to die after the strong winds of the Typhoon (not that bad in fact after wise). I had to protect the setup, without creating a sail... A simple food wrap around the structure gave enough protection to the young radis, tomato plants & basil...


For sure we are less exposed as we are facing west/north west, but we had enough wind gusts to slice the seedlings during the previous Typhoons. We'll see this week if they survived.


New water tank system

Last summer, I ran out of water because of a tiny leak, but also because my daisy chained IKEA Trofast buckets system didn't work. So September was a fresh start, with new ideas. A lot of garden hydroponics/aquaponics systems are using food grade blue barrels, and it happens that they are widely available in Hong Kong: any construction supplier have these as bins, or they recycle them as so.
I went to a nearby shop and selected a 60 Kg barrel, 80 HK$: worth it ! Cheaper than 2 IKEA Trofast for more than 4 times the volume. It comes with a locking top, so I wonder if it can be pressurised or not...


I also ordered some 1/2" Uniseal online as they are an easy solution to have the PVC tubes going thru the buckets and keep a good seal. I also got a little UV light from the Fish Market. They are made to be inline in your water flow and kill all nasty bacteria.


3 holes are drilled on top and fitted with the Uniseal: 2 in the front, one in the back. Another 12V pump will go at the bottom equipped with the same inline 25cl bottle filter (so cheap & so efficient). The 2 front hole will connect with the sump. One is coming from the sump pump, and the other is the overflow. You need an overflow system as it is a 2 pump system and whatever you do, the two identical pumps will not have the same flow after a while.


The overflow is going thru a syphon with the intake about 20cm below the max level, so as soon as the water reaches the top of the Uniseal, the water drop will initiate the syphon, and will empty the top of the barrel in less than a minute, back to the sump.

As the sump will get all the water system and the main tank overflow, it needs to handle a bigger amount of water. By linking several Trofast buckets from the bottom (with Uniseal), I manage to enlarge the water reservoir.


As you can see, there are 4 buckets linked, but the last one has an elbow and a vertical tube. This is the overflow for the sump system. When too much water is getting in the sump, the water level will go up, and reach the top of the tube, and overflow in the last bucket. This is the last chance before the sewer ! In fact, I could put a security pump here with a water level switch: if it reaches the max level of this bucket, then we can pump the water back to the main barrel...


Sunday, August 23, 2015

How to grow chili flakes

It is quite simple: you leave your setup during summer in Hong Kong, and when you get back, the mix of high heat, evaporation, and caterpillars you'll have dry chillies !


Ok, I modified my setup in July, and it wasn't a bright idea... I ended having a tiny leak at the bottom of the sump/filter and I couldn't manage the daisy chained water tanks to work properly.

But now the temperatures went down a bit, it's time to grow things again.

Wednesday, July 22, 2015

Playing with venturi


In order to save power (off the grid setup), I'm trying to get rid of the air pump. A lot of people in the Aquarium community are using a water pump with a venturi effect. YouTube is full of exemples, so I decided to give a try.

The idea is to insert a small air intake (little tube) in the water flow. To emphasise the effect, you'll need a pressure difference.
A lot of videos and webpages give exemples using a pen body inserted in the PVC tube, or a tiny clear flex tube with an angled cut.


Using a T and the tube reducing the section in the 1" water pipe, you create the velocity increase needed for the suction in the air intake.

In this video you can see the pump in action with an adjustable depth clear tube. It really depends on your water flow.


Sunday, July 19, 2015

Sump pump & filter

To beat the heat  & algae problem, I was looking for a solution or a least a way to minimise the invasion.

Step 1: How others do ?


Being in Hong Kong also has its benefit: you have restaurants with fish tanks all around the place, and they also have to beat the heat & algae problem. So by having a look at their setup I found out that they have a quite simple setup including a mechanical filter and a UV lamp for most of them. Nothing fancy, nothing costly. And for sure, they renew the water quite often, which is impossible for a cost effective hydroponic setup.

Step 2: Internet is your friend (again)

After some research on YouTube & other blogs about aquariums (these guys have years of research ahead, and the DIY community is just massive), I found some interesting & cheap setups based on layer filters and also inline filters for pumps.


Step 3: The inline pump filter

First, the pump I used is 12V pump, placed in the bottom of the sump. But I secured the thing with the filter you can see in the video. It is composed of a cheap 25cl plastic bottle with the bottom cut, and the cap drilled to fit your pump intake. Then you add some water cleaners (from Fish market), and balls (in the aquarium/aquaponics setups they are supposed to host bacteria to consume the fish poop and turn it to nitrates), and a layer of cotton style foam (again, Fish market).
The pump by itself can clean your tank in 30mn... but the foam get clogged fast.


Step 4: The first layer

First, the pump I used is 12V pump, placed in the bottom of the bucket. It will take the water from the bottom, so you need room around. The first layer is composed of plastic balls to have a good flow of water.

Step 5: The second layer

You need to filter, as the first layer is just for the flow, the second has to handle some debris. So I went with cheap loofa from a local 1$ bazar. I took 10 of them. Some are free, some are left as a string.


Step 6: The last layer

All the sumps will go thru this layer, so you'll need to keep most of the crap here. It is based on floss filler. In fact, this is an experience, so I may add one coarse layer on top of this one. The floss filler comes from the Fish Market. You can buy bulk packs for 40-60 HK$.


Step 4: Final step

The pump is on the bottom, so I had to connect the flex tube to the 1/2" PVC tube that comes out from the top. The valve you see is just to drain the lower part, when it's charged with residues.


Tuesday, November 4, 2014

Moteino are in the house !

So after researching online which node I would use for the sensors/actuators network, I first had a look at the Jeenodes as they are quite popular and cheap. The main issue today is that they are using a RFM12B radio module from HopeRF, and this part number have been phased out last year. The replacement unit is the RFM69W, which is not yet supported by Jeenodes. So far, the best developments made around the RFM69W/HW and Arduino comes from Felix Rusu of LowPowerLab: the Moteino.

As it was designed to be a wireless node, the RFM69W is directly soldered on the Moteino pcb and there are different options for antennas (no antenna, 1/4 wavelength wire, SMA connectors, etc.)
There is no FTDI chip on it to save space and also costs.

For the gateway, you need a Moteino USB as this one has to be permanently powered, the USB connectivity & power feed is a better solution.


I also took a Power Shield as it drives & charge a LiPo battery and provide juice for the node. Once assembled with a cheap HK$45 LiPo pack from Sham Shui Po, it looks nice !
Now the tests. Once the library installed, there is an exemple for the node, and one for the gateway. The gateway still plugged to the computer, and you open the Serial monitor inside Arduino IDE, and the strings start to be transmitted.

The range is more than what is needed, but it will help to have a wireless connection between the sensors (pH, Water Temperature, Air Temperature, Humidity, Light, EC, etc), the actuators (pH up, pH down, Nutrients A, Nutrients B, Water), and the controller (Raspberry Pi with IoT software).


Sunday, November 2, 2014

Installing the perilstatic pumps

I've bought 5 perilstatic pumps on Taobao from Kamoer (KPP-S06-DG-C0). They are quite cheap and the only drawback is, like all perilstatic pumps, the tube has to be changed every 6 months or so. You better order some silicon tubing at the same time.


The big clear IKEA Trofast container that was helping algae to develop will now be used as the solutions storage. An additional small Trofast will get the pumps.

I've drilled 5 holes (30mm diameter) in zig-zag (4 cm far from each center, the two lines are 2cm far from each other).
5 holes will be drilled for the silicon tubes to reach the bottles stored underneath. And one more for the wiring. I'll put the electronic board with the TIP120 transistors and the Arduino in that level too. You'll need another hole to reach the motor poles.
I've selected 12V pumps because I'll have the solar panels feeding a 12V battery system, so it's much simpler that way.


The system can add pH+, pH-, nutrients A, nutrients B solutions to the circuit. One water jar will be added to the system to flush or add water to the circuit.
The flow of each pump need to be calibrated as it depends on the section of the silicon tube. So for the water jar, you better have a bigger section (-S10).
Maybe I'll add the batteries for the solar panels in that tank too.


Wednesday, October 22, 2014

Getting off the grid

Since hydroponics run on power for the water pump, and the air pump, if you want to go further close to the real deal, you could grow your food without consuming more power than a natural setup would do.
Many grower around the world have Solar Panels setup to run their pumps and control units. And being near Shenzhen where a lot of things are manufactured, gave me the opportunity to get some panels.


But we got a balcony,  not a garden or a terrace. And worse, the exposition is not full South, but more West. So I have to get the maximum yield of that sun exposure. So I selected custom made flexible panels (flexible and easy to install). After communicating with an "manufacturer"/integrator, they could provide 4 custom made panels of 15cm x 92cm. So 3 of them would fit the big length, and one the short return. Why the flexible Sunpower cells ? Because they are made for RV or Boat rooftops. So they "like" not to be oriented or angled to south or 90° angle sun rays.


 You can order these panels with front or back power connection. They are all equipped with MC4 connectors, so it's easy to daisy chain.
 4 panels will give 17.4 V. Perfect voltage for my MPPT solar charger.


Tuesday, October 14, 2014

Calibrating the perilstatic pump

 So I received the pumps ordered on Taobao. As many forums gave various feedback on these pumps I decided to calibrate them.

In fact, for the experience, I added a cooking scale under the receiving tank and measure the water weight... as 1cc = 1 gram, it is quite easy to measure !

I ran some tests and finally, 60s equal 30cc. Easy, eh ?

To drive the pump, it is quite easy: a single TIP120, a 1K to 3.3K resistor and a power supply. Schematics & explanation can be found here.


Using a simple diagram to drive them with the Arduino, I ran the pump for a minute and measure the amount of water that have been moved from one container to another.

Saturday, October 4, 2014

Structure modifications

The first modifications were to replace the clear tube between the Trofast boxes.
Instead of a direct drop to the next bucket, I used a 15mm PVC tube with a interconnect. The interconnect has a threaded male part than goes thru the Trofast, and we screw the female part on top of it. The height of that female part is perfect as the water level is just in contact of the netpots bottom.


The bottom of each dropdown tube is glued with hotglue gun and I drilled 6 holes to make some kind of shower head. The tube is just plugged into the interconnect.

Under the dropdown tube, I now have a bell with holes to prevent clay pebble to enter the tube and get stuck at the bottom. As they are bigger than the holes, the flow was restricted and I had the installation flooding the balcony.
You need a lot of holes, and they have to be under the water level. Drill also the top of the bell otherwise the syphon effect will empty the whole bucket.
I've also added more shelves on the right side. But they are not running yet.
As the tomatoes need more heights I can now leave them on the right side and have some room for the leaves.
 After a few weeks, I had a algae invasion, all the clear aquarium tubes became coated with green and the tank turned green. So I filtered the water and removed the clear tubes.


I now use the frame PVC tube to feed the water to the top, so I added a T near the tank, with a treaded adapter and a water hose brass male plug. The aquarium pump is now feeding the system thru a 30cm soft tube and then it goes to the top in the PVC frame.

Sunday, September 7, 2014

Seedlings !

Ok, we got the structure almost done, the water pump is in the bottom tote, and the air pump is tied to the frame, so it is time for something to grow ! As I wanted to start from seeds, I bought some CocoPods. These are compressed Coco discs that expand in the water.

Check my friend's website to see how to handle lettuce seeds as they are tiny tiny.

 The 2-3 first days, it is better to hide the seedlings from light. The lid is great as it keeps the humidity level high (it is quite rare to have super dry weather here in Hong Kong anyhow).
When the seedling are well developped, and the roots are going thru the pods/foam, they are ready to transplant in the netpots.
Seeds don't grow at the same speed, so transplant only the viable ones...
The Typhoon killed my first batch by bending the stems...