Sunday, July 31, 2016

Mini setup during the summer break


While I was back in France, far from my hydroponic setups, I couldn't resist to build another setup for next year. I'll have to rely on my inlaws to start the seedlings, but the idea is to get tomatoes & herbs for next summer.
I'll have to build the sensors for my next trip in February so I'll be able to remote monitor the installation.

The Grow Pipe


 First we'll start with a standard 100mm gutter water chute pipe. They are quite easy to find in 4m length or pre-cut. Get the Elbow that fits the 100mm. In France, they are not 90° but 87° so when you make a U with 2, the long pipes are not parallel.
I took one Male-Female, and one Female-Female elbow.

  • 2 x 100mm rain water pipe, 1m long,
  • 2 End caps (punch down connections,
  • 1 Male Female 87° Elbow
  • 1 Female Female 87° Elbow
  • PVC Glue
Take 2 mn to check the type of PVC glue you are buying. While in Hong Kong, they are all Hot Weather grade, in France, 80% of them are cool temperature grade... So when it's hot, they dry super fast.


The end caps I found are ready to connect 32 & 40mm pipe by just punching the pre-cut hole. It is quite convenient so you don't have to drill or loose length with adapters & reductions.

 Just glue the end caps on the 1 meter pipes. I have one intake positioned on top of the pipe, while, the water exit is on the lower part of the pipe.

 To keep the grow pipe in place on the water tank, I found these glue-on reductions (32mm). I will not glue them, but just clip the 100m in the brace.
You can see the Female-Female Elbow, and the Male-Female one.

Connections


The trick here is to use off the shelf items from any constructions/DIY shop. You are looking for opaque flexible pipe, so I found one to connect tap to the washing machine. They are threaded and come with the seals, so it's quite convenient. I also grabbed a flex to water pipe adapter and a 32mm pipe to 1/2" PVC connector.
The male connector of the washing machine hose will go on the Water Tank side and connect the flex pipe.
The female side will connect to the 32mm pipe adapter. On this side, I had to use a short 32mm PVC pipe glued inside the 100m end cap.


  • Washing Machine connection kit
  • 32mm to threaded adapter (that fits your washing machine kit end)
  • hose adapter (that also fit your washing machine kit end)


The water tank
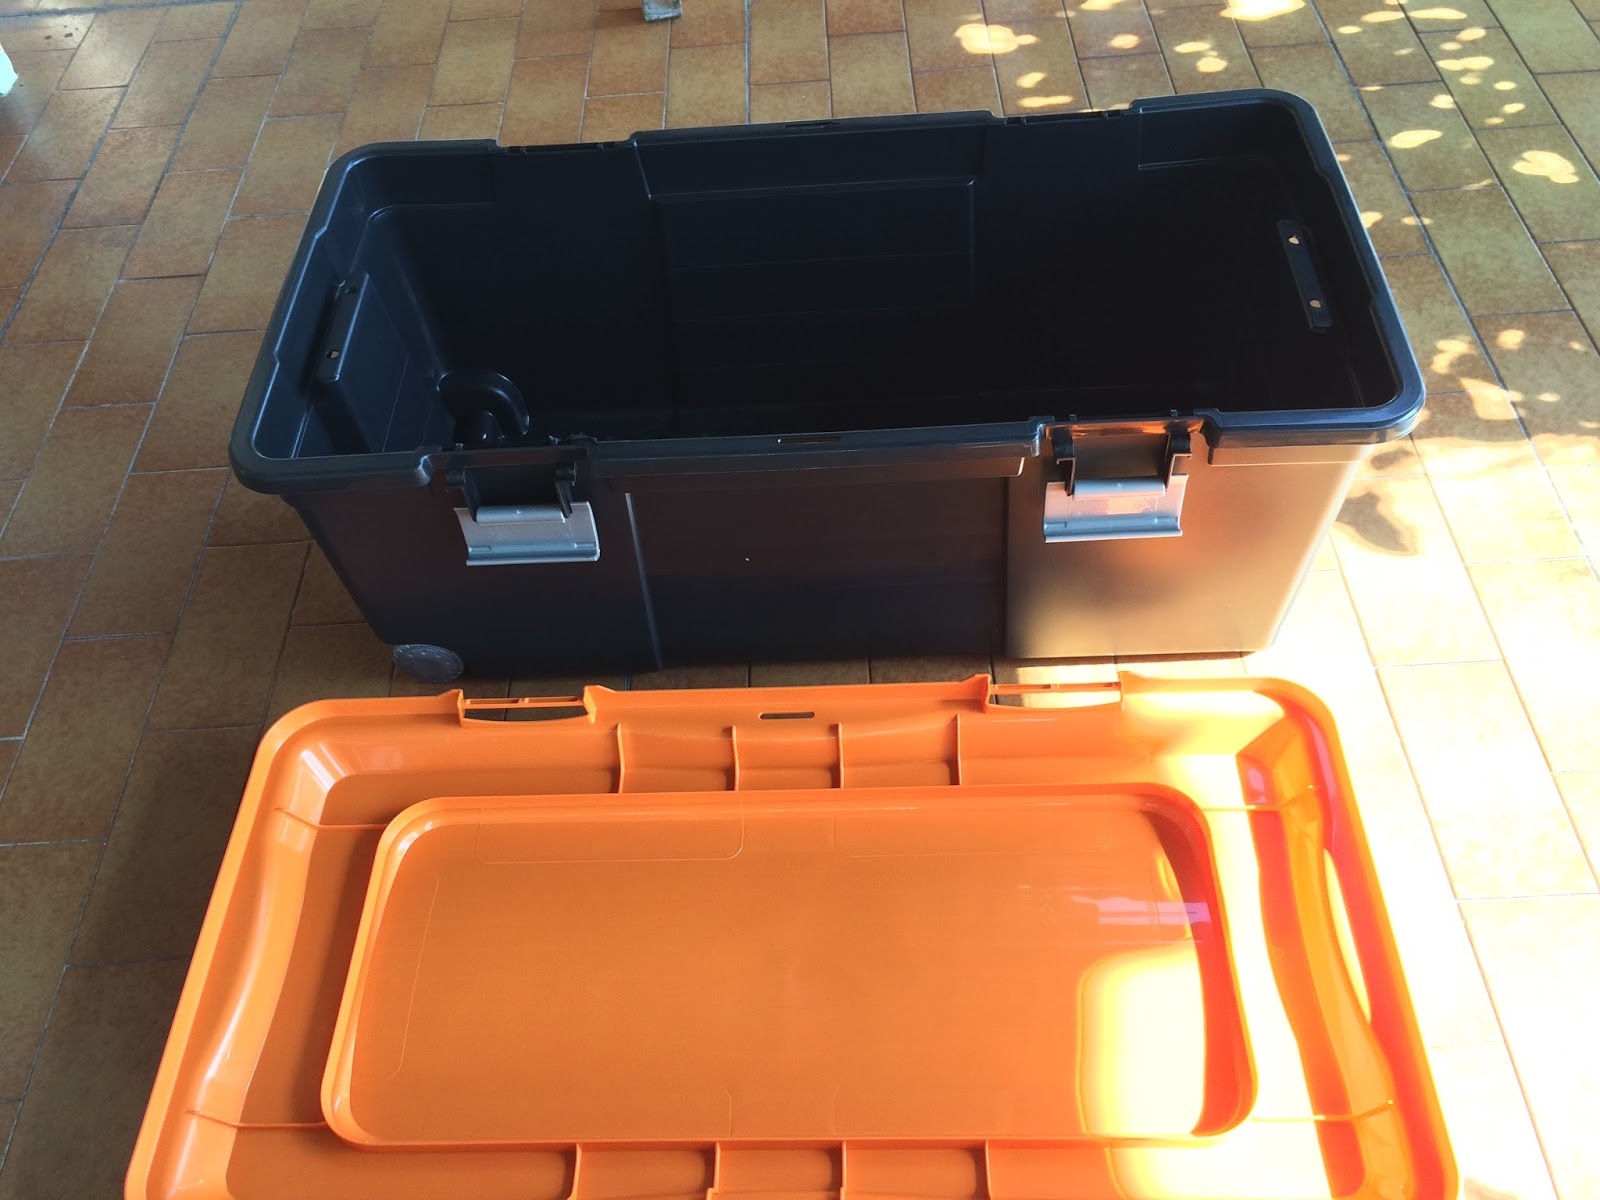

At the same DIY/Construction shop I found a super deal for 3 totes. They are 75l and what you need is a complete opaque one. Don't get any clear clothe storing ones...
Mine comes with wheels, but once loaded with the water, they'll probably crash...


  • 1 Big opaque tote (50-75l) big enough to support your grow pipes


The only thing that I had to order online is a little  pump. This is the minimal power I found on Amazon, and it's tiny.
You can be picky and go for the lower power consumption. The needed lift is not big (40cm) so you'll have many choices.

  • 50cm of clear aquarium hose (10-12mm)
  • 1 mini aquarium pump (40cm lift)


To connect the pump, drill the tote on the top of the tote. The hole has to be the same size as the male end of the washing machine connection kit. Grab a seal that fits, and screw the hose adapter.
You can then connect the clear tube (10-12mm) on the hose adapter, and plug the pump on the other end.
Place the power cord where the cover will still lock. 

As we want our tank to support the grow tube, place it on top of the cover and mark down where the braces would sit.
Then drill a 32-36mm hole for each of the 4 braces.

If you drill 36mm, the pipe will go inside and then you can glue it, if you drill 32, then use a piece of 32mm pipe as leg to sit on the bottom of the tote.


Here, I took the option of drilling 32mm, and use 32mm legs.


Last part: water return

As you remember, we have 3 holes in the end caps, two at the lower part, one at the top.
For the water return, we'll use one of the bottom one. If it's a NFT (Nutrient Film Technique) system, you don't want a lot of water in the pipe... If you want to convert it to a DWC (Deep Water Culture), then use the top hole for the exit as well.
We'll use:

  • 50cm of 32mm PVC tube
  • 1 Female Female 87° elbow
  • 1 Male Female 87° elbow
For this one you'll have to adjust the small part of 32mm pipe in between your elbows to match the distance between the grow pipe and the return hole in the tote.
First drill the 32mm hole in the tote, then glue one elbow, and position the exit elbow.


The system is almost finished once you get the exhaust pipe in place.

You can also use that setup with the grow pipe fixed on a wall, then your In & Out would need to be repositioned.


One more step before the Final one

Connect everything and fill some water in the tank (about 10cm) and give a try. Check your connections and seals and it should not leak... It is better to reglue pipes and check for leaks now than after drilling the grow site holes.

Finally: the grow site holes

Finally, you can drill he hole for your net pots. Now it is really up to you and what you want to grow. 
Vines or bushes like tomatoes, cucumbers, zucchinis would need more space between roots. Herbs and Lettuce can accommodate a higher density.
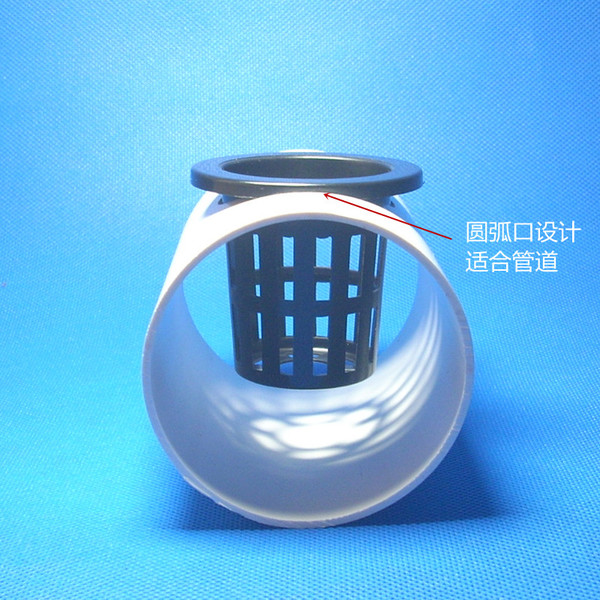

So just order the net pots first or grab some at the local gardening shop and draw a line a the top of your tube and calculate your spacing.
I like my net pots black (no light no algae) and now some of them have a carved surrounding to accommodate a circular grow tube.


Wednesday, June 1, 2016

New indoor project: green wall

As we have a small aquarium with guppies, I started to think about running a green wall of house plants (that can clean the indoor air at the same time). I went online and found a nice set of planters from Greensun that can be mounted on the wall or on a metal frame.


The Greensun planters can be daisy chained and they have this water drop, but it is quite messy, and also, there is not much water in each planter, so I added some 1/2" PVC pipe on top of the water outlet to raise the water level to flood each planter, and then drain it creating a syphon with a simple U made of elbows.
Another add on to prevent water to spill between each planter is to put a piece of 10mm clear tube between each planter, that would drain the water out to the next planter.


At the bottom, you can see my favorite IKEA Trofast Bucket that host the 12V pump. I've added a little plastic bottle with acrylic fibers as a filter as described in this video. That will prevent clogging. I'm also using Reverse Osmosis quick connect tubing to bring water to the top as clear tubing will allow algae growth.
For now, it is not a real Aquaponics setup, as the sump tank is not connected to the aquarium, but I'm transferring some of my water changes from the aquarium to the green wall (most of the time they go in the regular Hydroponic setups).


Sunday, November 22, 2015

We're moving !

Our landlord decided to get back the apartment so we are moving. Sorry, I can't change the name of the blog to 28th Floor mini farm, but the spirit is still there... Unfortunately the balconies are different but at least we got 2 !
I tried to pack everything for our movers to process without killing too many plants, but that's where hydroponics aren't easy... traditional soil plantations, they know how to handle, but hydroponics... not really. So I disassembled the whole system and reorganised the plants to fit one or two Ikea green Trofast.


The good thing about Hong Kong, is that they are super fast... 3 hours after packing the plants, they slammed the door of the new one, and everything was installed... Ok, it took me the afternoon to setup the new system (I cheated a bit by preparing the frame on the little balcony).


Unfortunately, moving tomatoes in November with all the rain and humidity didn't help, and they never turned ripe... and the vines rot :(


Sunday, October 4, 2015

Typhoon cheap protection

This time, I didn't want my seedling to die after the strong winds of the Typhoon (not that bad in fact after wise). I had to protect the setup, without creating a sail... A simple food wrap around the structure gave enough protection to the young radis, tomato plants & basil...


For sure we are less exposed as we are facing west/north west, but we had enough wind gusts to slice the seedlings during the previous Typhoons. We'll see this week if they survived.


New water tank system

Last summer, I ran out of water because of a tiny leak, but also because my daisy chained IKEA Trofast buckets system didn't work. So September was a fresh start, with new ideas. A lot of garden hydroponics/aquaponics systems are using food grade blue barrels, and it happens that they are widely available in Hong Kong: any construction supplier have these as bins, or they recycle them as so.
I went to a nearby shop and selected a 60 Kg barrel, 80 HK$: worth it ! Cheaper than 2 IKEA Trofast for more than 4 times the volume. It comes with a locking top, so I wonder if it can be pressurised or not...


I also ordered some 1/2" Uniseal online as they are an easy solution to have the PVC tubes going thru the buckets and keep a good seal. I also got a little UV light from the Fish Market. They are made to be inline in your water flow and kill all nasty bacteria.


3 holes are drilled on top and fitted with the Uniseal: 2 in the front, one in the back. Another 12V pump will go at the bottom equipped with the same inline 25cl bottle filter (so cheap & so efficient). The 2 front hole will connect with the sump. One is coming from the sump pump, and the other is the overflow. You need an overflow system as it is a 2 pump system and whatever you do, the two identical pumps will not have the same flow after a while.


The overflow is going thru a syphon with the intake about 20cm below the max level, so as soon as the water reaches the top of the Uniseal, the water drop will initiate the syphon, and will empty the top of the barrel in less than a minute, back to the sump.

As the sump will get all the water system and the main tank overflow, it needs to handle a bigger amount of water. By linking several Trofast buckets from the bottom (with Uniseal), I manage to enlarge the water reservoir.


As you can see, there are 4 buckets linked, but the last one has an elbow and a vertical tube. This is the overflow for the sump system. When too much water is getting in the sump, the water level will go up, and reach the top of the tube, and overflow in the last bucket. This is the last chance before the sewer ! In fact, I could put a security pump here with a water level switch: if it reaches the max level of this bucket, then we can pump the water back to the main barrel...


Sunday, August 23, 2015

How to grow chili flakes

It is quite simple: you leave your setup during summer in Hong Kong, and when you get back, the mix of high heat, evaporation, and caterpillars you'll have dry chillies !


Ok, I modified my setup in July, and it wasn't a bright idea... I ended having a tiny leak at the bottom of the sump/filter and I couldn't manage the daisy chained water tanks to work properly.

But now the temperatures went down a bit, it's time to grow things again.

Lots of seeds !!!

During the summer break in France, I was able to collect some seeds for my friends at Amazing Green Hydroponics (I got my seedling foam & nutrients from them).


We'll give a try for some different species. I had some help from the Gamm Vert sales guys picking species that grow during the heat season, so we'll see how they perform in Hong Kong.

Wednesday, July 22, 2015

Playing with venturi


In order to save power (off the grid setup), I'm trying to get rid of the air pump. A lot of people in the Aquarium community are using a water pump with a venturi effect. YouTube is full of exemples, so I decided to give a try.

The idea is to insert a small air intake (little tube) in the water flow. To emphasise the effect, you'll need a pressure difference.
A lot of videos and webpages give exemples using a pen body inserted in the PVC tube, or a tiny clear flex tube with an angled cut.


Using a T and the tube reducing the section in the 1" water pipe, you create the velocity increase needed for the suction in the air intake.

In this video you can see the pump in action with an adjustable depth clear tube. It really depends on your water flow.


Sunday, July 19, 2015

Sump pump & filter

To beat the heat  & algae problem, I was looking for a solution or a least a way to minimise the invasion.

Step 1: How others do ?


Being in Hong Kong also has its benefit: you have restaurants with fish tanks all around the place, and they also have to beat the heat & algae problem. So by having a look at their setup I found out that they have a quite simple setup including a mechanical filter and a UV lamp for most of them. Nothing fancy, nothing costly. And for sure, they renew the water quite often, which is impossible for a cost effective hydroponic setup.

Step 2: Internet is your friend (again)

After some research on YouTube & other blogs about aquariums (these guys have years of research ahead, and the DIY community is just massive), I found some interesting & cheap setups based on layer filters and also inline filters for pumps.


Step 3: The inline pump filter

First, the pump I used is 12V pump, placed in the bottom of the sump. But I secured the thing with the filter you can see in the video. It is composed of a cheap 25cl plastic bottle with the bottom cut, and the cap drilled to fit your pump intake. Then you add some water cleaners (from Fish market), and balls (in the aquarium/aquaponics setups they are supposed to host bacteria to consume the fish poop and turn it to nitrates), and a layer of cotton style foam (again, Fish market).
The pump by itself can clean your tank in 30mn... but the foam get clogged fast.


Step 4: The first layer

First, the pump I used is 12V pump, placed in the bottom of the bucket. It will take the water from the bottom, so you need room around. The first layer is composed of plastic balls to have a good flow of water.

Step 5: The second layer

You need to filter, as the first layer is just for the flow, the second has to handle some debris. So I went with cheap loofa from a local 1$ bazar. I took 10 of them. Some are free, some are left as a string.


Step 6: The last layer

All the sumps will go thru this layer, so you'll need to keep most of the crap here. It is based on floss filler. In fact, this is an experience, so I may add one coarse layer on top of this one. The floss filler comes from the Fish Market. You can buy bulk packs for 40-60 HK$.


Step 4: Final step

The pump is on the bottom, so I had to connect the flex tube to the 1/2" PVC tube that comes out from the top. The valve you see is just to drain the lower part, when it's charged with residues.


Saturday, July 18, 2015

Heat !

Not much posts for a while, because now in Hong Kong it's really hot and everything almost died, except chilies...


As a lot plants died with the heat and I had to handle a lot of seedlings, I thought I could try a regular grow bed with pebbles so I can plant & remove dead plants easily.


I also wanted to give a try to cucumbers. It grows fast ! But then I got worried that there were no fruits and all the flower were blooming and then dropped and cover the floor... In fact, that's normal as Cucumber grow male flowers at the beginning and no female flowers. So after 3 weeks I finally got the first female flowers that can grow cucumbers.
Unfortunately, I got hit by aphids & whiteflies. They also jumped on the chilies & basil :( I tried soap water, bleach water, but the whole plant was sucked down but these nasty bugs. I couldn't find flypaper in time, and the whole plant died while we were away in June.


Now it's summer time with max temperature, typhoons, storms and all the nice things that makes expats fly away, but I'm still here. The only thing that grows now are the chilies, basil (not much anymore), chives.
My friends from Amazing Green Hydroponics & Mizutech gave me Kale seedling but they never grew and died :( It's just too hot outdoor. They grow them well in Kwai Chung but they're indoor.


Wednesday, April 22, 2015

April Tomatoes

April is one of the perfect month this year. Usually it rains a lot, but this year it's ok. It means also that it's not too hot usually, but it's getting hotter. Perfect conditions for our plants !
 As you can see everything went massive. The tomato plants are about 4-5 meter long (undetermined type) and they even go to the neighbour !
 Don't forget the Basil, Mint, Lemon Balm, Vietnamese Coriander (Rau Ram, Persicaria Odorata), strawberries...
But after a few days, the heat started to kick in, and unfortunately I had my first pump issue... so the plants suffered a bit. Usually it's ok for tomato plants to suffer during fruits, but HK heat is maybe too much.
About 860g of tomatoes ! It went very well with basil in a nice Caprese Salad :P

Tuesday, February 3, 2015

Harvest time !

So finally we could harvest some cabbage (both types) and also the red radish. The only drawback with the radish is that it is difficult to get a bowl of radish as they usually don't grow at the same rate !

First bowl of Bok Choi !


Second harvest


Tomatoes look promising ! And we are still in Winter...


So we still have these vegetables growing:
  • Tomatoes (multiple plant as it is easy to take a sucker and grow roots out of it),
  • Red radish (almost gone, need to start a new batch of seedlings),
  • Bok Choi,
  • Chinese cabbage,
  • Strawberries (I just discovered a ripe one after 6 months),
  • Mint (3 types),
  • Basil (3 types),
  • and finally Coriander ! This one came out after 4 months...
I killed the squash at they never bloomed and started to look bad... and they were sucking all the water !
We also ate the Red Romaine... just average. I'm not sure I'll grow more seedling as they are quite weak and tend to die.

As you can see, I upgraded the water distribution with quick connect 1/8" pvc pipe (from taobao, water reverse osmosis kits). I have a good flow (enough) and it is easy to connect/disconnect grow beds.